We use cookies to help provide a better website experience for you, and help us to understand how people use our website. Our partners will also collect data and use cookies for ad personalisation and measurement.
Clicking "Accept" will allow us and our partners to use cookies, learn more in our cookie policy or to change your cookie preferences, click "Manage".
User Consent
To find out more about cookies and the types of cookies we are setting please visit our cookie policy. If you'd prefer that certain types of cookie are not saved on your browser when visiting our website, use the toggles below to adjust those preferences and click "Save choices".
Strictly Necessary
These cookies are necessary for the website to function and without them you would not be able to reliably use the website. For example, loading your basket or completing forms.
Affiliate Groups
These cookies helps us ensure that specific affiliate partner are credited for any purchases you make. These cookies are only set if you have landed on-site through an affiliate partner and you have accepted their terms and conditions in which allows for information to be shared between us and the affiliate partner.
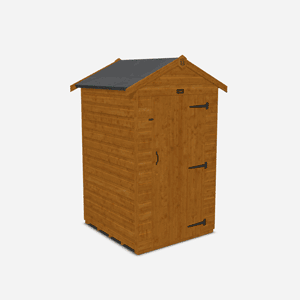
One question we’re frequently asked is, "How difficult is it to build one of your sheds?" Well, the good news is – it’s not hard at all! Whether you're a seasoned DIYer or just starting out, building a Tiger Shed is a manageable and rewarding project. With a little help and the right instructions, you'll be enjoying your new garden shed in no time.
In this guide, we’ll walk you through how easy it is to build a traditional Tiger Apex Garden Shed. But first, let’s explore what makes our sheds stand out and why assembly isn’t something to be afraid of.
The Tiger Sheds Range: Something for Everyone
At Tiger Sheds, we offer a wide range of garden buildings to suit every need and space. Whether you're looking for a traditional apex shed, a stylish summerhouse, or a practical workshop, we’ve got something for you. Some of our most popular models include:
Traditional Apex Garden Sheds – Perfect for storing tools, bikes, and garden equipment.
Tiger Workshops – Ideal for DIY enthusiasts and those who need a dedicated workspace.
Log Cabins – Adding a little luxury to your garden, with extra room for relaxation or even turning it into a home office.
Summerhouses – Designed for entertaining or just enjoying a quiet moment in your garden.
All of our sheds are crafted from high-quality timber, designed to withstand the elements, and come with the Tiger Guarantee, so you can rest assured that your shed will last for years to come.
Building Your Tiger Shed: Simple Steps, Great Results
When it comes to assembly, our sheds are designed to be as straightforward as possible. Each shed comes with clear, step-by-step instructions to guide you through the process. Even if you’ve never assembled a shed before, you’ll find that it’s easier than you think!
Here’s a general idea of what to expect and how to build a shed:
Preparation – Make sure the ground is level, clear, and ready for your shed base. This is the most important first step, ensuring your shed is stable and secure.
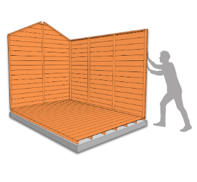
Assembling the Panels – Our sheds arrive in pre-fabricated panels, so you’ll just need to put them together like a giant jigsaw. It’s as simple as aligning and securing the panels in place.
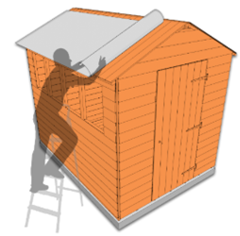
Roofing and Finishing Touches – Once the walls are up, the roof panels go on, and you'll have your shed weatherproofed and ready for action.
If your shed has extra features, like additional walls or windows, the process will vary slightly, but don’t worry – we’ll walk you through the changes in the assembly instructions.
For a more in-depth guide, check out our Buyer's Guide, which provides useful tips for selecting the right shed for your needs and further instructions on building it.
A Shed for Every Skill Level
While assembling a shed might seem like a big task, it’s important to remember that you don’t need to be a professional to get the job done. Most of our customers find the process straightforward, with a bit of assistance and patience. If you have a friend or family member who can lend a hand, even better!
And don’t forget – if you ever feel like you’d rather leave the heavy lifting to the experts, we offer an installation service for a hassle-free experience.
Preparing to Build Your Shed: Essential Steps Before You Begin
Before you dive into assembling your new garden shed, there are a few essential steps to take care of. Proper preparation will ensure that your build goes smoothly, and your shed stands the test of time. Here’s a quick checklist to help you get started:
1. Check Your Base
A firm, level base is critical to the stability and longevity of your shed. Before assembly, make sure your base is prepared and ready. It should be made from durable materials like concrete or paving slabs to ensure your shed sits evenly and securely.
If you're unsure how to build a strong base, don’t worry! You can find detailed instructions in our Build a Base Guide to help you with the setup. A solid foundation will make the assembly process much easier and more efficient.
Once your base is ready, it's time to check all the parts that came with your shed. Every Tiger Shed arrives with a comprehensive component list, allowing you to cross-check what you have against the instructions. This will help you avoid any surprises during assembly.
Typically, your shed will include panels for the walls, floor, and roof, along with felt and all necessary fixings. Top Tip: Take the time to go through your components before you start assembling. This ensures you have everything you need, so you won’t have to stop midway to search for missing pieces.
3. Check You Have the Right Tools and Assistance
For a smooth build, you’ll need a few basic tools. Here’s a list of what’s required:
Hammer
Monkey Wrench or Adjustable Spanner
Step Ladder
Spirit Level
Tape Measure
Safety Gloves (or appropriate Personal Protective Equipment)
Top Tip: It’s always best to have at least one other person helping you with the assembly. Having a second set of hands makes it much easier to hold components in place while securing them. This teamwork will speed up the process and ensure everything is aligned correctly.
4. Safety First
While assembling your shed can be a fun DIY project, safety is key. Always wear protective gear, such as safety gloves, and ensure your work area is clear of obstructions. Having someone assist you will also help reduce the risk of accidents, as one person can hold items in place while the other works with tools. Stay safe and take your time—this is an important step in ensuring a successful build.
By preparing your base, checking your components, gathering the necessary tools, and prioritising safety, you'll be ready to begin assembling your Tiger Shed with confidence. Now, it’s time to get building!
How to Assemble a Garden Shed: Step-by-Step Guide
Assembling your Tiger Shed might seem like a big task, but with our easy-to-follow guide, you’ll have it built and ready for use in no time. From the floor to the roof, every step is designed to be simple, ensuring that you can enjoy your shed without stress. Here’s a breakdown of how to build a wooden garden shed.
Step One: Position the Floor Panel
Start by laying your floor panel(s) in the desired position, ensuring it is level. It’s also a good idea to check that the floor is square by measuring diagonally from corner to corner. Both measurements should be the same.
Tiger Tip: If your floor is not square, check the panels against the corresponding side of the floor. If the panels match up, they might have shifted during transit. You can gently tap the corners to realign them.
Step Two: Position and Secure Gables and Sides
Next, position one gable end panel onto one end of the floor panel. After that, attach a side wall panel to the gable using nails, nailing through the side and into the gable.
Using the coach screws provided, secure the gable panel to the side panel. Once the first gable and side are secured, repeat the process with the second gable and final side panel.
When all the wall panels are in place and sitting square, secure them to the floor using nails. Nail through the side and gable panel base rails into the floor joists.
Tiger Tip: Use the pre-existing lines of nails across the floor as a guide to align the base rails correctly with the bearers below.
Step Three: Position and Secure the Roof Panels
Place the roof panels onto the structure, ensuring they’re correctly positioned. Use 65mm nails to secure them to each other. You might need to pull the panels together at the apex before nailing them into place.
Once the roof panels are secured to each other, nail them to the gables and side frames using the provided nails.
Tiger Tip: If the roof panels don’t align properly, or if the door is misaligned, it could indicate that the building isn’t sitting square. If this happens, slightly lift the corners of the shed to straighten it out before securing the roof panels.
For a step-by-step visual guide, watch our Apex Shed Roof Assembly Video to make the building process even easier.
Step Four: Felt the Roof
Before beginning, check if your shed size requires multiple pieces of felt. You can cut the felt if necessary, as indicated in the felt guide provided.
Start by rolling out the felt along one side of the roof, leaving an overhang that you can fold down onto the roof frame. Secure the felt with clout nails along the top edge. Repeat the process on the opposite side of the roof.
Depending on your shed size, you may need to repeat the process along the upper sections of the roof, overlapping the felt at the apex. Some sheds may require a ridge piece, so be sure to consult the felt guide.
For additional help, look at our How to Felt a Shed Roof guide for more detailed instructions.
Tiger Tip: Don’t set the first strip of felt too low, or you might not have enough material to cover the roof. Aim for an overlap of around 3 inches to ensure full coverage.
Step Five: Fit Bargeboards and Finials
Secure the bargeboards to the roof panels, trapping the overhanging felt in between to create a weatherproof seal. Once the bargeboards are positioned, secure the diamond-shaped finials to the apex of the bargeboards.
Tiger Tip: Bargeboards are often longer than the roof panels. If you prefer, you can trim them to be flush with the roof edges before securing them into place.
Step Six: Fit and Seal the Glazing
Now it’s time to fit the glazing into the window frames. Use the provided panel pins to secure the glazing, tapping them gently to avoid scratching.
If your shed has styrene windows, remember to remove the protective film before fitting. Once the glazing is in place, seal the windows with a suitable sealant like silicone or mastic to ensure they’re weatherproof.
Tiger Tip: Leave the protective film on the glazing until the panes are fitted to avoid scratches. You can also use a piece of thin cardboard between the glazing and hammer to prevent damage.
Step Seven: Fit the Corner Strips
To finish the assembly, use nails to secure the corner strips where the panels meet. These may need to be cut to size.
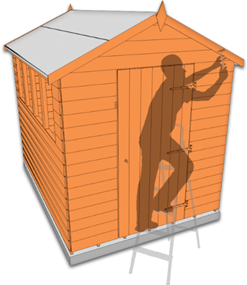
Once the corner strips are in place, treat your shed with a waterproofing preservative to protect it from the elements, ensuring its durability inside and out.
And just like that, your wooden garden shed is ready! By following these steps, you'll have a sturdy, functional garden building that’s perfect for storage, hobbies, or even as a cosy retreat. Enjoy your new space!
FAQ: Common Questions About Building Your Tiger Shed
Here are answers to some frequently asked questions to help you with your shed assembly:
Do all sheds need a base?
Yes, all sheds require a solid and level base to ensure they remain stable and secure. A base made of concrete or paving slabs is ideal. For detailed instructions, check out our Build a Base Guide.
What does a Tiger Shed delivery include?
Your Tiger Shed delivery will include everything you need to build your shed, including the panels, roof, floor, fixings, and felt. A full component list will be provided with your delivery, so you can easily check everything is in place before starting assembly.
Will my Tiger Shed come with instructions?
Absolutely! Every Tiger Shed comes with easy-to-follow, step-by-step assembly instructions. These instructions are designed to guide you through the process smoothly, from start to finish.
Certainly! Here are a few more common questions about building a shed that you might want to add to the FAQ section:
Can I build a shed on my own, or do I need help?
While it's possible to build a shed on your own, we always recommend having at least one other person to help. Having an extra set of hands will make assembly much easier, especially when securing larger panels or positioning the roof.
How long does it take to build a Tiger Shed?
The time it takes to build a shed depends on its size and complexity. Generally, a standard garden shed can take around 4-6 hours to assemble with two people. Larger or more complex sheds may take longer.
Do I need to treat my shed once assembled?
Yes, it's important to treat your shed with a suitable preservative to protect it from the weather. We recommend using a waterproofing treatment both inside and outside the shed to ensure long-lasting durability.
Can I move my shed once it’s built?
Once your shed is assembled and securely fixed in place, it can be challenging to move. If you need to relocate your shed, it’s best to disassemble it first and then rebuild it in its new location.
Do Tiger Sheds come with a warranty?
Yes, all Tiger Sheds are backed by the 20-year Tiger Guarantee. This warranty covers the structure for a specific period, depending on the product. For more details, check the warranty information provided with your shed.
Building your Tiger Shed is a straightforward and rewarding process that can be completed with ease by following our simple step-by-step guide. From preparing the base to securing the roof, each stage is designed to help you create a sturdy and functional garden building. With clear instructions and helpful tips along the way, you’ll soon have a shed that’s ready for use.
If you're ready to get started, browse our range of high-quality Tiger Sheds and explore our comprehensive guides to ensure you select the perfect shed for your needs. Whether you're looking for a traditional apex shed or something more unique, we have something to suit every garden. Visit our website to find the ideal shed and get all the information you need to make your project a success. Happy building!
At Tiger Sheds we have a massive range of repayment options, we are sure there will be one to suit you.
Find out more about the repayment options using our handy finance calculator.
A 10% deposit will be required as standard (exc. Pay In Three).
Choose your budget
What is the total cost of your chosen product(s)?
£
%
Choose a repayment term (months)
You may wish to reduce the time it takes to repay your finance
OR
OR
3 Payments
Interest Free 0% APR
Classic 9.9% APR
Deposit
£0.00
Amount of finance
£0.00
Repayments
48
APR
9.9%
Interest
£0.00
Monthly repayment
£0.00
Total to repay
£0.00
Total payable
£0.00
* Pay in 3 equal payments – first when your order is confirmed, second 30 days later and third 60 days later. No interest, no fees.
Please note: Pay In 3 is only applicable to orders with a value of £1500 or less.
Choose Klarna in checkout to apply for a finance option. 10% deposit required as standard (excluding Pay In Three).
Borrowing more than you can afford or paying late may negatively impact your financial status and ability to obtain credit.
REPRESENTATIVE EXAMPLE
Cash/purchase price: £1200. Deposit: £120. Total amount of credit: £1080.
Rate of interest: 9.9% p.a. (fixed). Duration of the agreement: 24 months.
Monthly repayments: £49.58. Interest: £109.91. Total amount payable: £1309.91.
The Representative APR: 9.9% APR Representative.
Tiger Sheds is a trading name of Woodlands Home And Garden Group Limited (reg. address: Calverley Lane, Leeds, LS13 1NP)
which is authorised and regulated by the Financial Conduct Authority (FCA FRN 914564) and acts as a credit intermediary
and not a lender, offering credit products provided exclusively by Klarna Financial Services UK Limited. Please note
that Pay in 3 instalments agreements are not regulated by the FCA. Finance is only available to permanent UK residents
aged 18+, subject to status, T&Cs and late fees apply.
Klarna.com/uk/terms-and-conditions